
The Creative Journey: Crafting an Embroidered Potholder
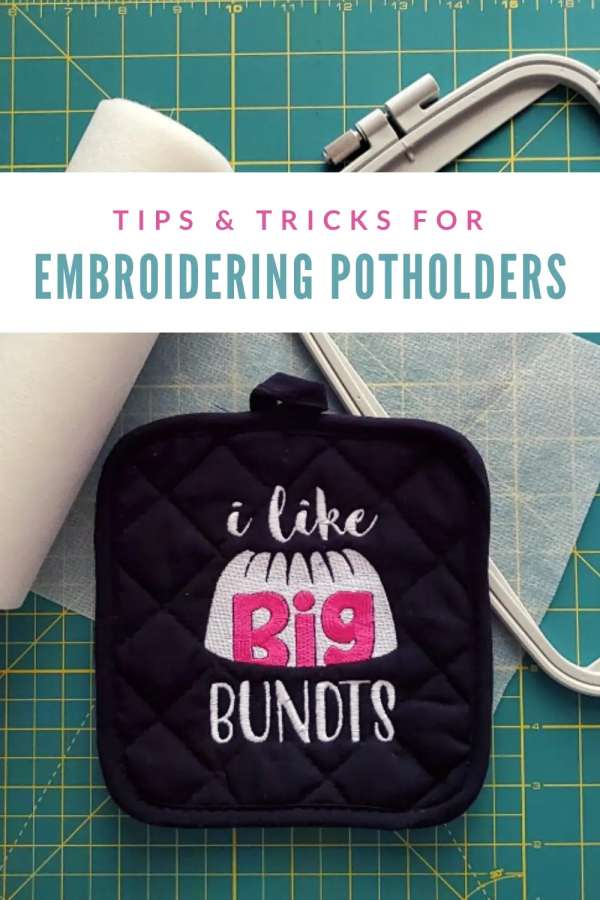
While we’re still a bit away from the festive season, I always believe in getting a head-start on crafting gifts. A delightful kitchen-themed pattern I recently discovered on my favorite design platform was just what I had in mind for my aunt. She’s a huge fan of our neighborhood’s Nothing Bundt Cakes shop.
Why not add this adorable design to something she’d use while whipping up her favorite recipes? Introducing my step-by-step guide on creating embroidered potholders!
Though stitching on cotton and then assembling the potholder yourself is an elegant touch, I’m a fan of keeping things uncomplicated. I often opt to add designs to ready-made potholders. Especially since they’re easily available at Dollar Tree, making them a cost-effective choice for a personalized gift!
The main challenge with these potholders is managing the embroidery’s reverse side. But don’t worry, we’ll dive into this, and you’ll see how straightforward it can be!
Choosing the Right Stabilizer
For a seamless finish, opt for a stabilizer that’s invisible post-embroidery. My go-to choices are wash-away or tear-away stabilizers. The sticky, self-adhesive tear-away or fusible kind are my favorites since they ensure the potholder stays in place during the embroidery phase. Although some might suggest temporary fabric glue, I’m cautious about chemicals on items exposed to heat. ️
If intricate patterns are your thing, the sticky tear-away might be a bit tedious to remove. In such cases, a wash-away stabilizer would be your best bet. And remember, if the quilted texture of the potholder gets disrupted by the needle, a layer of water-soluble topping before embroidery can do the trick!
Design Tips
Ensure your potholder remains flexible after embroidery; avoid extremely dense designs. To tackle this, I tweaked the stitch count of my pattern from Embroidery Super Deal. Using a thicker 30wt thread, I modified stitch lengths and densities to get the desired result.
Floating vs. Hooping
Hooping a store-bought potholder can be tricky, so floating it above the stabilizer is a better approach.
For added stability when floating, think about incorporating a basting box. Though temporary, it’s an excellent preventive measure against any shift during embroidery.
Managing the Potholder’s Back
Deciding how to handle the reverse side of an embroidered store-bought potholder can be a puzzle. Here are some creative solutions:
- Use bobbin thread that matches the potholder’s hue. This way, even if some top threads are visible, they blend with the potholder.
- For patterns with fewer color changes, synchronize the bobbin thread with the top thread for each shade. This technique is particularly effective for designs that look identical front and back.
- Join two potholders post-embroidery for a thicker feel. Given that Dollar Tree potholders aren’t the most premium, this also adds a touch of luxury.
- Stitch an additional fabric layer at the back, creating a pocket for your hand. Fashion it like a shirt pocket and attach it along the potholder’s existing seam.
Embroidering Your Potholder: Step by Step
Here’s a quick walkthrough to help you create your embroidered masterpiece:
- Mark the design’s center on your potholder. Depending on your potholder’s color, use chalk wheels, placement stickers, or water-soluble pens.
- Hoop your chosen stabilizer. For those using sticky stabilizers, hoop with the paper side facing up. Remove the paper and stick the potholder.
- Load your design and align it concerning the potholder. Double-check all threads and needle settings. Once ready, press start!
- Post embroidery, use a seam ripper to get rid of basting stitches. Then, remove the stabilizer, trim any extra stitches, and neaten the design’s back.
- If you’re going for the double-layered look, stitch along the binding seam of both potholders using cotton thread that complements the potholder’s color.
At A Glance: Potholder Embroidery Essentials
| Steps | Details |
|---|---|
| 1. Design Selection | Opt for non-dense designs to maintain potholder flexibility. |
| 2. Stabilizer Choice | Wash-away or tear-away, preferably self-adhesive for stability. |
| 3. Floating vs. Hooping | Floating is preferred for store-bought potholders. |
| 4. Managing the Back | Matching bobbin thread, stitching two potholders, or adding a hand pocket. |
| 5. Embroidery Process | Marking, hooping, aligning, stitching, and cleaning up. |