
Have You Ever Embroidered a Yoga Mat?
Embroidering yoga mat bags is something we see often, but a direct embroidery on the yoga mat itself is a rare delight! With the right tools and a bit of patience, you can achieve this. While my first attempt was a lesson in what not to do (poor old mat ), I’ve now honed the technique. I’m thrilled about buying premium yoga mats to adorn with custom designs as gifts for loved ones.
Ideally, a multi-needle embroidery machine with special hoops would make this task a breeze. Yet, working with just my single-needle machine and a standard hoop, I found a way.
What You’ll Need
- Embroidery machine
- Yoga mat of choice
- Stabilizer: Double layer tear-away with a water-soluble topping like Sulky Solvy
- Needle: A 75/11 embroidery needle. I prefer the gold Schmetz. For denser designs, you might need a sharper needle.
- Thread: I lean towards 40 wt polyester embroidery thread, but rayon, cotton, or thicker threads work too.
- Fabric adhesive spray, for example, Odif 505
- Your chosen embroidery design (I adore satin-stitched names!)
- Small scissors for finishing touches
Selecting the Perfect Yoga Mat
Yoga mats come in various materials such as vinyl, rubber, and even jute! The trick is picking a mat soft enough for needle penetration and slim enough to slide under your machine’s embroidery foot.
Embroidering the Yoga Mat: A Walkthrough
1. Pinpoint Your Design’s Location
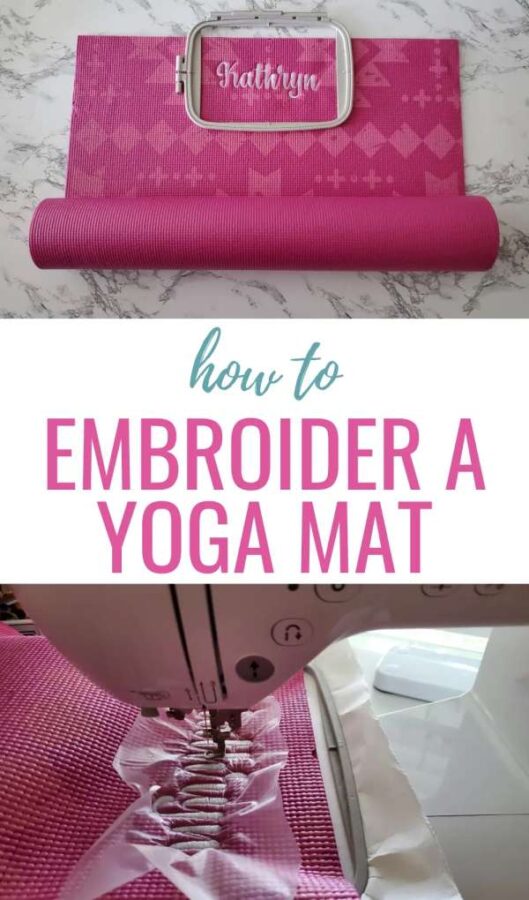
Decide your design’s position. I love placing names at the mat’s top front, visible during yoga sessions or when rolled up. Before marking the mat, test your marking tool to ensure removability. For me, small embroidery marking stickers work wonders over water-soluble pens.
2. Stabilizing Your Design
Yoga mats aren’t overly stretchy, so no need for cut-away stabilizers. Opt for your preferred tear-away or wash-away stabilizer. For intricate designs, double up your stabilizer. This also offers a protective layer between the mat and machine.
3. Securing the Mat for Embroidery
Without specialized hoops, it’s essential to fix the mat outside your hoop without leaving imprints. Adhesive sprays or stabilizers come to the rescue here. Remember to trial your adhesive choice to avoid mat damage. Different mats and stabilizers require different approaches, so testing is a must. Using magnets is another option, but proceed with caution.
4. Setting up the Machine
As you set your mat, ensure its rolled section is to your machine’s left. This avoids excessive rolling. After mounting your mat and hoop, load your design, adjust settings, and you’re set. Given the plush nature of yoga mats, overlaying a water-soluble topping can prevent stitches from sinking. Do remove any marking stickers before adding the topping.
5. Start the Embroidery
Hit start and marvel at your creation coming to life! It’s crucial to supervise the process, ensuring the mat remains fixed.
6. Wrapping up the Project
Once done, separate the stabilizer from the hoop. Carefully detach or wash it off the mat’s backside. Trim any stray threads and get rid of the water-soluble stabilizer. A final step is a thorough machine check for lingering fibers. Keeping your machine clean guarantees its longevity and optimal performance.
Quick Reference Table
| Item | Description |
|---|---|
| Machine | Single or Multi-needle |
| Yoga Mat | Soft and thin material |
| Stabilizer | Tear-away or wash-away, doubled for dense designs |
| Needle | 75/11 embroidery needle (Gold Schmetz recommended) |
| Thread | 40 wt polyester or equivalent |
| Adhesive | Fabric adhesive spray like Odif 505 |