
Embroidery enthusiasts, do you ever find yourself challenged by those little threads connecting parts of your design? Famously known as embroidery jump stitches, they can be quite the puzzle for newcomers!
When I started my journey with an embroidery machine, I too grappled with removing jump stitches, especially on delicate fabrics like tea towels. One unfortunate incident led to a clipped towel – heartbreak in the final moments!
Over time, I’ve honed my skills, and I’m thrilled to share some pearls of wisdom in my beginner machine embroidery series. Let’s delve into the art of trimming jump stitches.
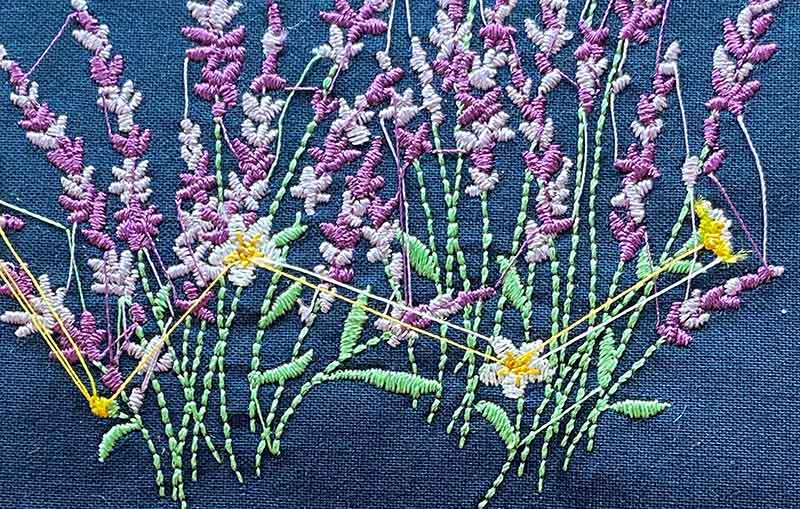
Understanding Jump Stitches
Jump stitches act as bridges between sections of the same color in an embroidery design. When your machine “jumps” from one section to another, these threads appear. Superior embroidery designs limit jumps, while subpar ones might have you dealing with a tangled mess post-stitching.
When to Make the Cut ✂️
While some top-tier embroidery machines boast auto-thread trimming, many of us, especially with budget machines, trim manually. Ideally, you should clear jump stitches after each color switch. This ensures your threads don’t tangle with the presser foot or needle. If there’s excessive jumping within one shade, feel free to pause and trim.
Pro tip: If using a water-soluble stabilizer, snip jump stitches before removing the stabilizer. Trust me, finding stitches amid terry towel loops is a challenge! Don’t stress over tiny stitches, though; even pro items have them.
Personally, I often push trimming to the end, especially for tiny stitches that don’t hinder the project.
Perfecting the Snip
When trimming, either remove the hoop or navigate around the machine. Use sharp, slim embroidery scissors to slide under the jump stitch, lifting slightly before clipping close to the design. Trim the front threads and ensure you don’t snip your actual design. If threads fray, a sealant like Fray Check works wonders.
Got a pile of threads? A lint roller or Seam-Fix quickly gets rid of them. I’ve heard of burning residual threads, but that’s a bit too adventurous for me!
The Right Tools: Scissors Selection
The right pair of scissors makes a world of difference. Aim for sharp, thin-tipped ones. While many swear by their favorite pair, here are a few I’ve tried:
- Double-Curved or Curved Scissors: My top pick! The unique design eases trimming, especially with the hoop still attached.
- Duckbill Applique Scissors: Perfect for most threads, but tricky in tight spots. The round bill prevents fabric damage.
- Embroidery Scissors: A basic pair works wonders, especially with the hoop removed.
- Thread Snips: These are super close-cutting tools, some even prefer spring-action snips.
- Seam Ripper: In a pinch, a sharp seam ripper does the trick. Watch out for fuzzing though!
Upgrade to Auto-trimming Machines
If manual trimming isn’t your thing, several embroidery machines offer automatic trimming. Consider models like Brother NQ1600E, Baby Lock Flourish II, Janome Memory Craft 500E, and Bernette 79. However, note that as these machines age, the trimming feature may not be as reliable.
Reducing Jump Stitches in Design
Proper digitizing or design editing can minimize jump stitches. Editing stitching sequences or design sections can sometimes eliminate unnecessary jumps. For more on digitizing, refer to your embroidery software resources.
Quick Reference Table:
| Topic | Details |
|---|---|
| Jump Stitches | Threads that connect parts of an embroidery design of the same color. |
| Trimming Time | After each color change or as per design requirements. |
| Scissors Types | Double-curved, duckbill applique, embroidery scissors, thread snips, seam ripper. |
| Auto-trimming Machines | Brother NQ1600E, Baby Lock Flourish II, Janome Memory Craft 500E, Bernette 79. |
| Design Tips | Proper digitizing or editing can reduce unnecessary jump stitches. |