
Silhouette Studio + Machine Embroidery: A Seamless Collaboration
Guess what? Silhouette Studio can guide your Silhouette Cameo to snip applique fabric tailored for machine embroidery designs.
The unique edge of Silhouette Studio over other software? You can seamlessly pull in embroidery design files, carving out precise cutting lines for applique fabric. No more awkward and inaccurate trimming in the hoop!
Dive into this guide to elevate your applique techniques using Silhouette. ✂️
Files & Formats: A Quick Overview
- Image files like PNG, JPG, and BMP? Silhouette Studio’s got you. But remember, these don’t hold cutting info. You’ll have to trace these to get your machine cutting.
- Vector files (DXF, SVG) are your best buddies. They tell your machine precisely how to cut a design.
- Embroidery machine files (e.g., PES, JEF, DST) pack stitching details but lack cutting instructions. So, if your embroidery design isn’t paired with a vector, you’ll need to craft cutting data for your Silhouette.
- Importing an embroidery design to Silhouette Studio lets the software sketch out those cutting lines for you. Handy, right?
Silhouette Studio Editions & Embroidery
Here’s a little something to note: The free version of Silhouette Studio covers the basics. Want to pull in embroidery designs or SVG files? Time for an upgrade. Here’s a breakdown:
- Silhouette Studio Basic: You can pull in DXF vector files. If only an SVG file is available, consider converting it, though it might not be perfect.
- Silhouette Studio Designer Edition: This one allows SVG files, the most typical vector format for embroidery designs.
- Designer Plus and Business Editions: To directly play with machine embroidery files in the Studio, these are your go-to editions. I personally adore the Business Edition (thanks to the Font Creator tool) but both are gems!
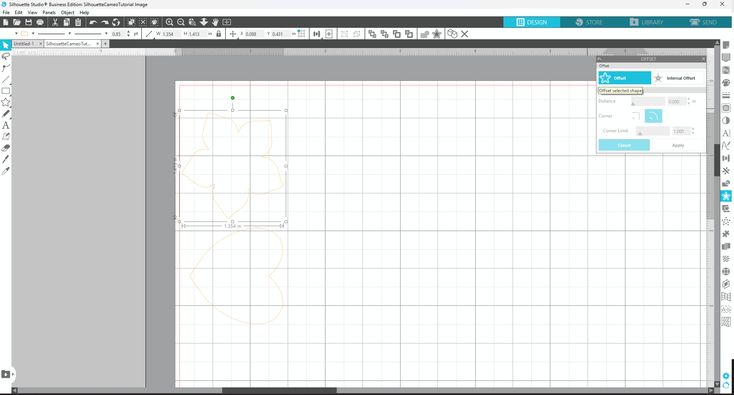
Working with Embroidery Designs in Silhouette Studio
Launching an embroidery design in the Studio is a breeze. Here’s a quick walk-through:
- Fire up Silhouette Design Studio. Go to File > Open. Pick your embroidery design (in a compatible format) and hit “Ok”.
- See the design in your workspace? If it’s taking time, be patient. Big, intricate designs might be a bit slow on the uptake.
- You can ditch parts of the design unnecessary for the applique, like text. But remember, never resize the design. That’ll throw off the applique fabric size.
- Next, separate each applique component of the design. If they’re grouped, just ungroup them. Keep only the single run placement stitch, and you’re all set!
Cutting Fabric Using Silhouette Cameo
Before we jump in, a note on the Silhouette Cameo 4: It’s blessed with a rotary blade, which cuts fabric like a dream. But if you’re rocking an older model, make sure your fabric is backed. As for backing applique fabric, I swear by HeatnBond Lite. It ensures smooth cuts and longer-lasting fabric.
When you’re ready to slice, just click the SEND tab, set up your tools and blades, and select the right settings. Once everything’s in place, press SEND, and watch the magic happen!
Embroidering with Your Freshly-Cut Applique Fabric
Loaded your embroidery design? Perfect. Hoop your fabric and stabilizer, and let the stitching begin! The process usually involves a placement stitch, placing the cut applique fabric, a tacking stitch, and wrapping up with a border stitch.
Choosing an Embroidery Machine for Silhouette
All embroidery machines gel well with Silhouette. But for a smooth experience, pick a machine whose embroidery files the Studio can read. I’m a huge fan of Brother embroidery machines.
| Key Details | Description |
|---|---|
| Software | Silhouette Studio |
| Unique Feature | Imports embroidery design files |
| Vector Files | DXF, SVG |
| Embroidery Files | PES, JEF, DST, etc. |
| Top Edition | Silhouette Studio Business Edition |
| Recommended Machine | Brother Embroidery Machines |