
Hey there, sewing enthusiasts! Luna here, your friendly neighborhood fashion designer. Ever faced the challenge of threading a mini sewing machine? I’ve been there, and I know that without proper guidance, it can be quite the puzzle. The instruction manual that came with mine wasn’t the most detailed. So, I thought of crafting a tutorial with vibrant step-by-step images just for you, especially if you’re fond of brands like Varmax, Magicfly, KPCB, and the like. Note: This isn’t for handheld sewing machines.
Prepping Your Bobbin
If you’re unboxing a fresh mini sewing machine, you’ll often find a pre-threaded bobbin inside. But, if you need to change it out, here’s how:
- Setting Up: Situate your bobbin thread on the spool pin. Extend the spindle to its full length, and then gently remove the plastic bobbin case. Now, take out the used-up bobbin. Safety tip: Ensure your machine is off, and it’s safe to work around the needle.
- Hand Rolling the Bobbin: Loop the thread through a bobbin hole and wind it tightly around. The thread end should stick out to the right.
- Bobbin Winding Mode: The handwheel on your sewing machine, that big purple circle, houses a small pin. Push and twist this pin to ready it for the bobbin. After placing the bobbin, ensure the thread tail faces outward. Trim excess thread before proceeding.
- Activating the Machine: I love using the foot pedal to wind, as it gives me better control. However, the ‘on’ button works too. Wind slowly for optimum quality. Once satisfied, turn the machine off, and remove the bobbin.
- Placing the Bobbin: Push the pin inside the handwheel, place the bobbin in its case ensuring the thread is wound clockwise, trim excess thread, and then seal it with the bobbin case cover.
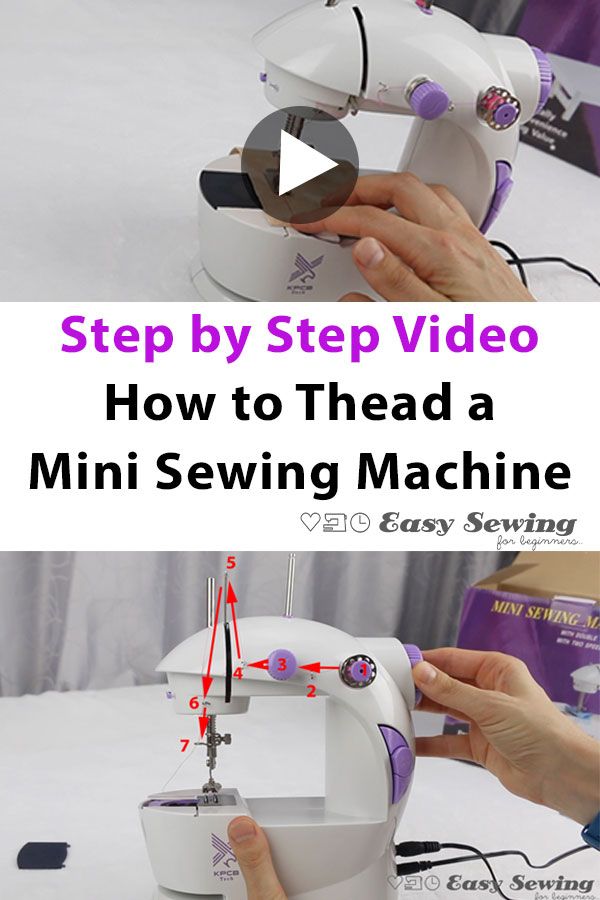
Top Threading Your Mini Sewing Machine
If you’re using a mini sewing machine for the first time, it’s likely threaded. But, here’s how you can re-thread if need be:
- Spool Set-Up: You can either use a large thread spool or a bobbin (as the top thread) on the spindle. Just ensure it unwinds from the left.
- Guiding the Thread: It’s a good practice to thread with the presser foot raised. Pass the thread through the front guide, then between the tension discs. Pull it through the subsequent guides, loop it through the needle’s side, and finally, thread the needle from the left.
- Fetching the Bobbin Thread: This is crucial before sewing. Holding the top thread, rotate the handwheel so the needle descends. As it re-emerges, the bobbin thread will follow. Tug gently to ensure both threads are ready to go.
Final Words Before You Dive In!
Voilà! Your mini sewing machine is all set to stitch wonders. The bobbin-winding step can be tricky, but trust me, practice makes it second nature. Ready for the next adventure? Dive deep into mastering the mini sewing machine’s operation!
| Key Details | Description |
|---|---|
| Machine Type | Mini Sewing Machine (not handheld) |
| Bobbin Type | Metal (but always refer to the manual) |
| Handwheel Function | Raises needle & aids in bobbin winding |
| Threading Direction | From left to right |

Complement the information with the following video:
Recommended:
How to Prewash Knit Fabric for Sewing (Should You?)
How to Use Embroidery Target Stickers for Placement
How to Thread a Singer Sewing Machine Easily (Pics+Video)
How to Embroider Clothes with a Machine (For Beginners)
How to Embroider Balsa Wood + Cute Christmas Ornament Idea
How to Thread A Sewing Machine Needle Easily – Tips & Tricks
How to Embroider a Onesie (Frustration-Free!)
How to Cut Velvet Fabric and Keep It from Fraying
Editor-in-Chief

sewing78x99sd3
Hello! I'm Monica, the creative mind behind sewing-beginners.com. On my blog, I delve into the world of sewing, sharing my passion and knowledge with a community of both novice and seasoned sewers. From foundational techniques and comprehensive tutorials to innovative projects and expert tips, I cover a wide array of topics to assist you on your sewing journey.
My aim is to make sewing approachable and fun for everyone. I offer detailed instructions, project inspirations, and practical advice to motivate and educate. Whether you're embarking on your first sewing project or looking to enhance your skills, my blog is here to guide and support you at every stage.
Join me on sewing-beginners.com as we explore the art of sewing together, crafting beautiful and unique creations with every stitch. Thank you for visiting my blog and being part of this fantastic sewing community!