Embroidering Sweatshirts: A Fun DIY Project!
Hey there, fellow sewing enthusiasts! It’s Luna here, and today I’m so excited to share with you one of my absolute favorite sewing projects: making personalized embroidered sweatshirts. Not only are these perfect as unique gifts (especially around the holidays), they’re also a fantastic way to add that special touch to your own outfits. So, are you ready to dive into the world of machine embroidery? Let’s get started!
Essentials for Embroidering Your Sweatshirt:
- Embroidery machine – Your trusty sidekick!
- Polyester embroidery thread – Great for vibrant colors and durability.
- 75/11 embroidery needle – For those intricate designs.
- Cut-away or no-show mesh stabilizer – I usually opt for a medium-weight cut-away.
- Water-soluble topping like Sulky Solvy – Helps with stitch clarity.
- Temporary fabric adhesive (if needed) – A lifesaver for stubborn fabrics!
- Marking tools – Either a fabric marking pen or chalk works wonders.
- Sharp embroidery scissors – Precision is key! ✂️
- Embroidery design – I sourced mine from Embroideres, but there are plenty of free designs available if you’re still deciding.
Choosing the Right Stabilizer:
The stability of your fabric is paramount when embroidering, especially with materials like sweatshirts. If your sweatshirt fabric is more on the stretchy side, or if your design is dense, I’d recommend a cut-away or no-show mesh cut-away stabilizer. However, for less intricate designs and more stable fabrics, tear-away can suffice. There are a few types of stabilizers out there, including sticky, fusible, and regular. For this guide, I’ll be using a regular stabilizer with some temporary fabric adhesive. Want to dive deeper? There’s a ton more to explore on selecting the perfect stabilizer for your embroidery tasks!
Step-by-Step Guide to Embroidering Your Sweatshirt:
- Prepping Your Sweatshirt:
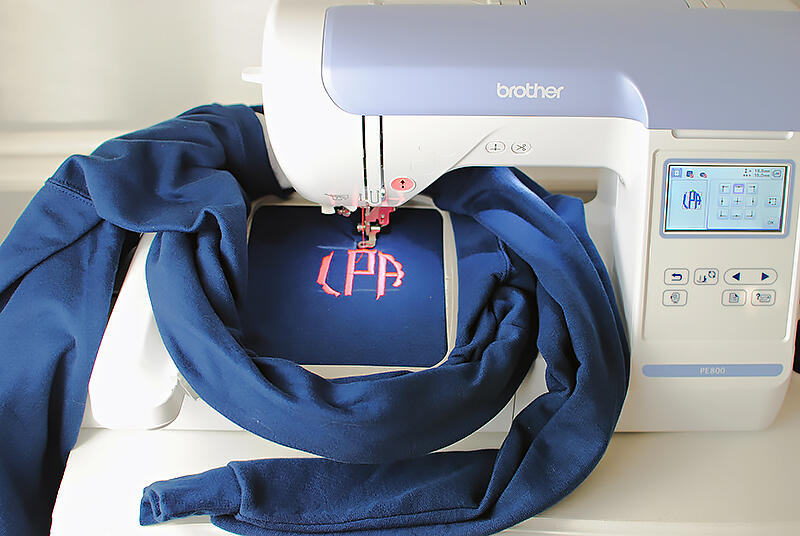
Begin by marking your design’s location. I typically use a water-soluble pen, but for darker colors, chalk is a go-to. Pro tip: use a printed template from your software to visualize the design’s placement. Once marked, attach your stabilizer to the sweatshirt’s back. If you’re struggling, a touch of fabric adhesive can help. - Hooping Your Sweatshirt:
Now, it’s time to secure your sweatshirt and stabilizer in the embroidery hoop. Aim to align the center of your hoop with your marking. Not a fan of hooping? Floating your sweatshirt on regular stabilizer is an alternative. - Machine Setup & Start:
Attach the hoop to your machine and ensure the sweatshirt’s back is out of the stitching area. Once your design is loaded and aligned, add a layer of water-soluble topping. Double-check the design, needle, and thread, and you’re good to go! - Finishing Touches:
After embroidering, remove the water-soluble topping and detach your sweatshirt from the hoop. Trim any excess stabilizer, and if desired, use a gentle spray to get rid of hoop marks. For a comfy finish, especially for kids or sensitive skin, consider an iron-on layer of Tender Touch backing.
Voilà! You’ve just crafted a beautifully embroidered sweatshirt. Rock it with pride or spread the joy by gifting it!
| Steps | Key Points |
|---|---|
| 1. Prepping | Mark design & attach stabilizer. |
| 2. Hooping | Align and secure sweatshirt in hoop. |
| 3. Machine Setup | Load design, check alignment & start. |
| 4. Finishing | Remove toppings, trim & add backing. |