
Thinking about a personalized gift for a furry friend or looking to enhance your home embroidery collection?
Maybe you just want to jazz up your pup’s collar with a unique touch. Dive into this guide on crafting a beautifully embroidered dog collar!
I’ll walk you through selecting the right stabilizer, deciding whether to hoop or float the collar, and picking out the ideal font for a name. Let’s dive in!
Materials You’ll Need:
- Embroidery machine with the suitable hoop
- Dog collar of your choice
- Needle: Opt for 75/11 embroidery needle; for thicker collars, go up to 80/12 and think of a sharp point if not making it through dense collars.
- Stabilizer: Opt for lightweight tear-away or wash-away with water-soluble topping if required (more on this below).
- Thread: My choice is a 40wt polyester embroidery thread for the top. I’ve also opted for white embroidery bobbin thread at the back. However, feel free to match the bobbin thread to the collar if desired.
- General embroidery tools like scissors, markers, etc.
Choosing the Right Stabilizer:
The sticky self-adhesive tear-away stabilizer makes the process straightforward, especially if you decide to float the collar. An alternative could be the sticky wash-away stabilizer.
For those able to hoop their dog collars, a lightweight tear-away stabilizer (no adhesive required) is sufficient. Remember, the collar itself provides strength. Thus, a heavy stabilizer might be overkill.
If you spot your stitches disappearing into the fabric, a water-soluble topping might be a savior.
Selecting the Collar:
Dog collars are excellent budget-friendly embroidery items. For bulk purchases, consider checking out renowned embroidery blank providers or even online marketplaces.
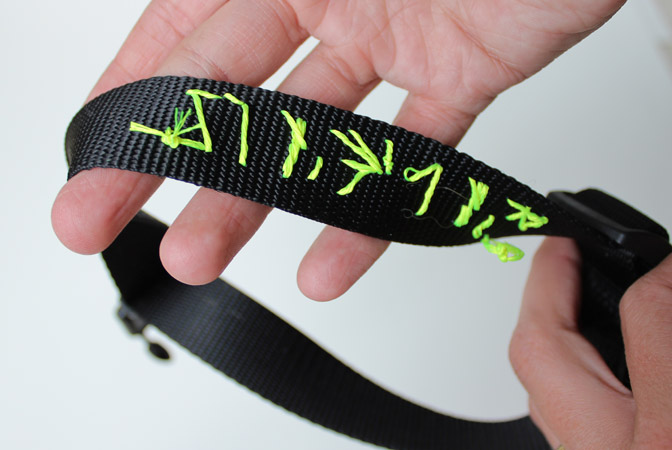
Picking the right collar involves considering its material, width, thickness, and if you’re embroidering on a single or double strap. Keep in mind, slimmer collars might demand smaller lettering, which could get overshadowed by the fabric’s texture.
Make sure the collar’s hardware, like buckles and rings, don’t interfere with the embroidery. This guide specifically looks at nylon webbing dog collars. Those with leather or different materials might need slight adjustments in approach.
Font Selection and Crafting Names/Numbers:
Aiming to include a name or number? Choose a font that stands out. A chunky block font is generally a good choice as opposed to thin fonts that might blend with the fabric’s pattern.
Your embroidery machine’s built-in fonts might suffice. Alternatively, explore online sources for additional embroidery fonts. For those working with .bx fonts, free Embrilliance Express can help combine letters. Else, rely on your favorite embroidery software.
Embroidering the Dog Collar Step-by-Step:
- Prepare the Collar: Detach any labels, adjust the collar size, and mark the centerpiece for the name.
- Hoop or Float the Collar: Depending on your collar’s thickness, decide between hooping it or floating it above the stabilized area. A water-soluble topping can be layered atop.
- Set Up the Machine: Load your hoop, select and center your design ensuring no hardware obstructs the embroidery area. Consider a slower pace for precise stitches on thicker collars.
- Start Embroidering: Launch the machine and monitor the process, ensuring a seamless operation.
- Finishing: Post-embroidery, remove excess stabilizer and neaten up the collar by trimming any stray threads.
Final Words:
Embroidered collars are not just a delightful gift for pets but also a valuable addition if you’re into the embroidery business. Wishing you happy stitching!
| Key Takeaways |
|---|
| Sticky self-adhesive tear-away stabilizer for floating the collar |
| Choose a bold font for better visibility |
| Monitor machine during embroidery to avoid issues |
| Always consider collar thickness and adjust methods accordingly |