
Embroidery Patches 101 with Luna
Hello, fellow stitch enthusiasts! It’s Luna here, your guide through the vibrant world of embroidery patches. Crafting bespoke patches can seem daunting at first—imagine coordinating a dance of thread and needle through the fabric. Yet, with a touch of patience and a dash of creativity, it’s quite a straightforward affair.
If you’re new to this, you might puzzle over questions like: “Can I turn this into an iron-on? Do I embroider directly on fabric or just stabilizer? What are the steps to crafting the perfect patch size?” Brush those concerns aside, because I’m about to unveil the magic behind machine-embroidered patches.
Discovering Patch Varieties
Patches are as unique as the individuals who create them, varying in dimensions, contours, thread work, and fabric. Diving into patch creation starts with a clear understanding of their diverse types.
Exploring Patches by Thread Density
- Fabric-Based Patches – These patches use a cloth backdrop to add a splash of color and texture, cutting down on stitch time and thread consumption.
- Thread-Only Patches – A tapestry of threads alone forms the patch’s main visuals and backdrop, resulting in a higher stitch count. A base fabric can be used for added robustness.
Edge Styles for Patches
- Fabric Encased Edges – Classic patches with a hefty satin stitch edge, ensuring a crisp outer border with no fabric protruding.
- Exposed Fabric Edges – Here, the fabric peeks out beyond the stitch boundary, offering a unique aesthetic and versatile trimming options.
Selecting Your Patch Fabric
Embroidering patches is a breeze when you pick a stable, non-stretchy, and fray-resistant fabric. Let’s peruse some of the top contenders:
- Patch Twill – Ideal for that quintessential patch feel; it’s sturdy and fray-proof, particularly designed for embroidery.
- Felt – Affordable and readily available; felt is perfect for patches with a soft edge, requiring no backing due to its non-fraying nature.
- Varied Fabrics and Appliques – Leather, denim, or cotton, paired with a backing, serve as excellent patch materials. Appliques can also reduce stitch counts and add flair.
- Stabilizer-Only Patches – For those minimalist designs, a heavy-duty stabilizer might suffice, especially for smaller patches.
Trimming Your Patch to Perfection
Whether you use a digital cutter, die-cutting machine, scissors, or even a hot knife, the goal is to shape your patch material for that immaculate edge.
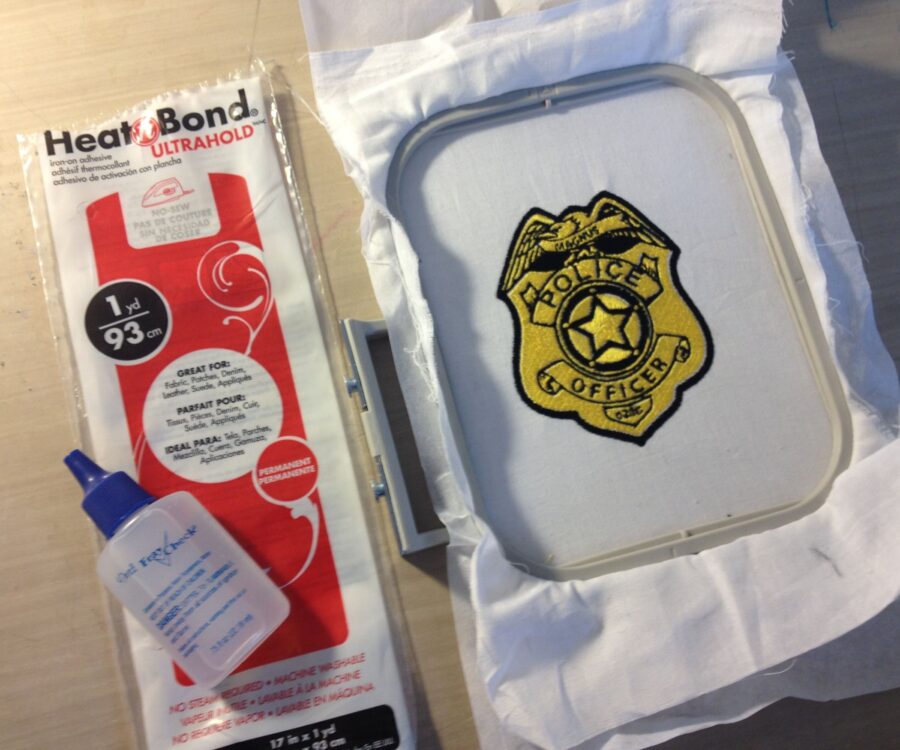
Attaching Your Patch
From sewing to iron-ons, hook and loop fasteners, or even adhesives—how you affix your patch depends on your end-use and preference.
The Backbone of Patch Making: Stabilizers
Select a heavy-weight, water-soluble stabilizer to support those dense stitches and keep your patch in place during the embroidery dance.
Digitizing Your Design
Constructing your patch design digitally is akin to choreographing a dance. You must sequence the placement stitch, the fill, and the all-important border stitch for a flawless finish.
Essentials for Patch Creation
Arm yourself with a robust embroidery machine, the right hoop size, a sturdy stabilizer, quality threads, and a touch of adhesive backing to bring your patches to life.
Embroidering Your Patch: A Step-by-Step Dance
Begin with hooping your stabilizer, setting up your machine, and laying down the placement line. Progress through adding your base, securing it, and then
layering those vibrant threads until your patch comes to full bloom.
Where to Adorn with Patches
Embellish jackets, hats, bags, or use patches to mend those pesky holes in kids’ clothing. The possibilities are endless and entirely up to your imagination.
Timeline of Patch Embroidery
The embroidery journey from start to finish can vary, with a standard 3-inch patch taking anywhere from 20 minutes to an hour depending on design complexity and your machine’s capabilities.
Embroidered Patches: Wrap-Up
There you have it, my comprehensive walkthrough on crafting custom patches with your embroidery machine. Eager to start? Or maybe you have a question that’s still unraveling? Drop a line and let’s stitch it up together!
| Aspect | Details |
|---|---|
| Types of Patches | Fabric-Based, Thread-Only |
| Edge Styles | Fabric Encased, Exposed Fabric |
| Fabric Choices | Patch Twill, Felt, Various Fabrics |
| Trimming Tools | Digital Cutter, Die-Cutting Machine, Scissors |
| Attachment Methods | Sew On, Iron On, Adhesive |
| Stabilizer Preference | Heavy-weight, Water-soluble |
| Design Digitizing | Placement, Fill, Border Sequence |
| Essential Supplies | Embroidery Machine, Hoop, Stabilizer, Threads, Backing |
| Embroidery Timeline | 20 to 60 Minutes Depending on Patch Size and Fill |